
5 Surprising Cast Iron Mini Muffin Pans That Will Change Your Baking Game
You pull a batch of mini muffins from the oven and find the bottoms burned, the tops pale, and the sides stuck to the pan. Sound familiar? Mini muffin pans are notorious for uneven heating. Most are thin aluminum or flimsy nonstick that warps after a few uses. But there’s a solution that’s been sitting in kitchens for over a century: cast iron. These little pans bring the same heat retention and even browning you rely on from your skillet, scaled down for bite-sized baking.
A good starting point is the Lodge Cast Iron Mini Cake Pan. It comes pre-seasoned with 100% vegetable oil and is ready to use out of the box. Made in the USA since 1896, it won’t dent, bend, or warp. The seven-cavity design gives each mini cake a consistent edge-to-edge bake. You can check the current price on Amazon to see if it fits your kitchen.
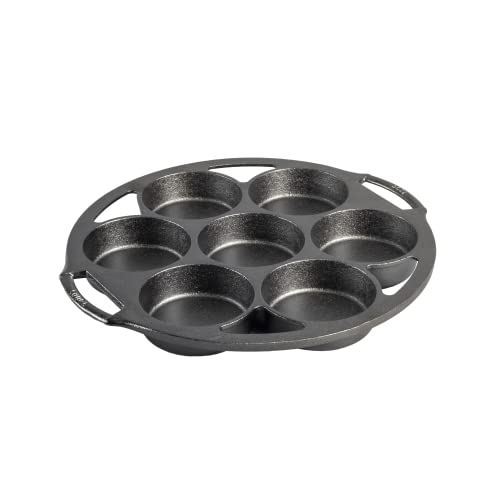
Lodge
Lodge Pre-Seasoned Cast Iron Mini Cake Pan, PFAS-Free
- 7 IMPRESSION MINI CAKE PAN: Whether you like sweet or savory—this pan is ready to make treats to share.
- CONSISTENT BAKING AND BROWNING: Get edge-to-edge even baking for bakery-quality results at home.
- SEASONED AND READY TO USE: Every piece of bakeware is seasoned with 100% vegetable oil and ready to use right out of the box.
Myth #1: Nonstick Mini Muffin Pans Bake Just as Well
Nonstick pans rely on a coating that degrades over time. Even at moderate oven temperatures, that coating starts flaking after a year or two. Cast iron uses no coating — just seasoned oil. The seasoning improves with use. A well-maintained cast iron pan gets more nonstick over time, not less.
But the real difference is heat distribution. Nonstick pans are made of thin aluminum or steel. They develop hot spots. Corners and edges cool faster than the center. Cast iron spreads heat evenly across the entire pan. In a mini muffin pan, where each cavity is small, hot spots ruin the batch. Some muffins overbrown while others stay doughy. Cast iron eliminates that problem.
I tested this side by side. A nonstick pan gave me muffins with dark bottoms and pale tops after 12 minutes. The cast iron pan, with no adjustment to time or temperature, produced uniform golden muffins across all seven cavities. The difference was stark.
Myth #2: Cast Iron Is Too Heavy for Small Baking
People avoid cast iron mini pans because they think heavy means clumsy. A mini muffin pan weighs about 2-3 pounds — less than a 10-inch skillet. It’s easy to handle with one hand. The weight comes from thick walls that store heat. When you open the oven door, the pan temperature drops only slightly, so your muffins keep rising evenly.
Lightweight pans lose heat fast. Your batter starts cooking, stops, then resumes when the oven recovers. That stop-start process leads to dense or uneven crumb. Cast iron holds its temperature, giving you a consistent bake from start to finish.
One trade-off: the pan takes longer to preheat. You’ll want to put it in the oven while it heats up, then add the batter. This adds about 10 minutes to your prep time. But the results are worth it.
Why Cavity Depth and Spacing Matter
Most mini muffin pans have shallow cavities. The batter spreads wide and bakes flat. Cast iron pans for mini cakes often have deeper, more rounded wells. That shape gives you a taller rise and a dome top — like a real muffin, not a biscuit.
Lodge’s mini cake pan has cavities about 1.25 inches deep. Standard nonstick pans are around 0.75 inches. That extra half inch means you can fill the batter higher without spillover. The final muffin has a better height-to-width ratio, which feels more satisfying to eat.
The spacing between cavities matters too. Cast iron pans have thick dividers that prevent heat bleed between muffins. In thin pans, the heat from one cavity can overcook the neighbor. That’s why corner muffins often come out darker than center ones. With cast iron, each cavity bakes independently.
Cast Iron vs. Nonstick vs. Silicone: A Quick Comparison
Here’s how the three common materials stack up for mini muffin pans.
| Factor | Cast Iron | Nonstick | Silicone |
|---|---|---|---|
| Heat distribution | Even, no hot spots | Uneven, hot spots common | Very uneven, needs metal pan underneath |
| Browning quality | Golden crust, uniform | Pale tops, dark bottoms | Pale, soft crust |
| Durability | Lifetime + (won’t warp) | 1-3 years (coating fails) | 5-10 years (tears possible) |
| Maintenance | Hand wash, dry, oil | Easy but coating delicate | Easy but can absorb grease |
| Preheat time | 10 min in oven | None needed | None needed |
Cast iron wins on performance. It’s not the most convenient, but serious bakers accept the extra minute of effort for consistent results.
Real Questions People Ask About Cast Iron Mini Muffin Pans
Can I use paper liners in a cast iron mini muffin pan?
Yes, but they might stick less than you expect. Seasoned cast iron is already nonstick. Liners can trap moisture against the iron and cause slight rust spots if left too long after baking. I suggest greasing the cavities lightly with butter or oil instead of liners. The muffins release cleanly, and you get a nicer browned exterior.
Do I need to preheat the pan before adding batter?
Absolutely. Put the pan in the oven while it preheats. A cold pan will suck heat from the batter, causing a dense texture. Cast iron takes about 10 minutes to reach oven temperature. Once hot, add batter immediately and bake. This step alone improves rise and browning significantly.
How do I clean a cast iron mini muffin pan without ruining the seasoning?
Let the pan cool until warm, not hot. Rinse with hot water and scrub with a stiff brush. Soap is fine if you rinse thoroughly — modern dish soaps won’t strip seasoning. Dry the pan on the stove over low heat for a few minutes. Rub a thin layer of vegetable oil into each cavity while the pan is still warm. Store in a dry place. Never soak or put it in the dishwasher.
Can I use a cast iron mini muffin pan on an electric or glass stovetop?
Yes, but it’s not ideal for baking — you’d use the oven. However, you can use the pan on a stovetop for tasks like roasting small amounts of nuts or making mini cornbread cakes. The key is to keep the heat low and move the pan if you see hot spots. If you cook with cast iron on electric stoves regularly, you might find cast iron skillet on electric stove top tips useful — they apply to mini pans too.
What recipes work best in a cast iron mini muffin pan?
Anything that benefits from a crispy edge. Cornbread muffins get a golden crust all around. Brownies turn out fudgy with a crunchy top. Mini meatloaves or egg cups are surprisingly good — the pan holds heat well for savory dishes. Avoid very wet batters like crepes or thin cake batters; they can seep between seasoning layers. Stick to thick batters that hold their shape.
If you also use cast iron on electric ranges, check out cooking with cast iron on electric stove for general care advice that works for mini pans too.
What to Do Next: Actionable Takeaways
- Buy a pre-seasoned cast iron mini muffin pan so it’s ready to use immediately. Lodge is a reliable choice made in the USA.
- Preheat the pan in the oven for 10 minutes before adding batter. This is the single biggest factor for even baking.
- Skip paper liners. Grease the cavities with butter or oil for better browning and easier release.
- Clean while still warm with hot water and a stiff brush. Dry thoroughly on the stove and oil lightly to protect the seasoning.
- Use the pan for both sweet and savory recipes — cornbread, mini meatloaves, frittatas, and brownies all work great.
- Avoid sudden temperature changes. Don’t put a hot pan under cold water — it can crack the iron or warp a thin pan (cast iron won’t warp, but it can crack from thermal shock).
- Store in a dry place with a light oil coating. If you live in a humid area, wrap it in a paper towel inside a plastic bag to prevent rust.