
5 External Thermometers for Ovens That Will Change Your Cooking Game
You preheat the oven to 350°F, slide in a tray of cookies, and set the timer. Fifteen minutes later the bottoms are burnt and the centers are raw. Sound familiar? Most built-in oven thermometers are either missing, broken, or just plain wrong. I have tested enough ovens to tell you that the number on the dial often has nothing to do with the actual heat inside.
An external oven thermometer fixes that. It sits inside the cavity, reads the real temperature, and lets you adjust your knob to match. In this article I will walk you through the five main types of external oven thermometers, how to pick one that actually lasts, and how to use it so your food comes out right every time. No fluff, just the details you need.
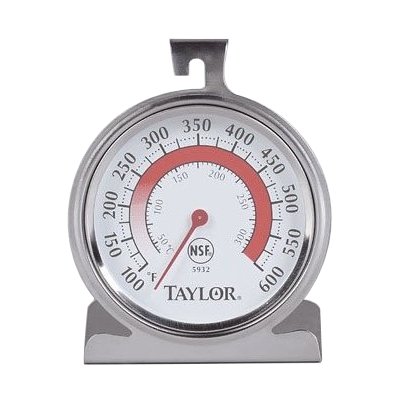
Taylor
Taylor Oven Thermometer
Accurate from -100 to 600 dgrees F or -20 to 300 degrees C
See on AmazonOne solid option to start with is the Taylor Oven Thermometer. It has a stainless steel body, covers from -100°F all the way up to 600°F (or Celsius equivalents), and carries an NSF listing for commercial kitchen use. That range handles everything from a low dehydrate to a high roast. It is not fancy, but it does not need to be.
Why Your Oven Lies About Its Temperature
Ovens cycle. They heat up, overshoot a bit, cool down, heat again. A built-in thermostat may be mounted near the heating element or far from it. Either way, it rarely reflects the air temperature at the center of the rack where your food actually sits.
I have seen ovens that claim 350°F but actually run at 380°F on the left side and 320°F on the right. That is a 60-degree swing. Cakes, breads, and roasts are sensitive to those swings. An external thermometer placed on the middle rack gives you a true reading after the oven stabilizes — usually about 15 to 20 minutes after the preheat beep.
Digital oven controls are not much better. They tell the heating element when to fire, but they do not measure the air where the pan is. Think of your oven as a room with a heater in one corner. The thermostat on the wall reads that corner, not the middle of the room. That is why you need a separate thermometer.
The Five Types of External Oven Thermometers
Not all external thermometers are built the same. Here is a breakdown of the five main form factors you will see, what each does well, and where they fall short.
1. Analog Dial Oven Thermometers
These are the classic round dials. A bimetallic coil expands and contracts, moving a needle across a face. No batteries, no screens, nothing to break electronically. The Taylor oven thermometer is a good example. It sits on a clip that hooks over a rack, or you can prop it on a baking sheet.
What they get right: Simple, cheap, reliable. You can leave one in the oven for years. The Taylor model’s stainless steel casing won’t rust. The NSF listing means it passed strict commercial cleaning tests.
What they get wrong: Analog needles are harder to read from a distance. Some cheap dials can be off by 25 degrees. Look for one that states accuracy within 10°F or better. The Taylor covers that range well.
2. Digital Probe Thermometers with Wired Probe
These have a display unit outside the oven and a metal probe that goes inside through the door gap. The display shows real-time temperature. Many come with a clip to hold the probe on a rack.
Better for checking oven temp without opening the door. But the wire gets pinched over time, and the display unit must sit on the counter where heat from the stove top can mess with readings. Use these if you want to monitor temp continuously during a long roast.
If you are already using a wireless oven thermometer for meats, you can often use the same probe to check ambient air temperature.
3. Wireless Digital Thermometers
These use a transmitter inside the oven that sends data to a receiver in your hand or on a magnet. No wires to crush. The transmitter sits on the rack and reads air temp.
They cost more and need batteries. But if you are someone who roasts turkeys at low temps for hours, being able to walk away and check the oven temp from the couch is worth the money. Make sure the transmitter is rated for at least 500°F, as some cheaper models shut down at 400°F.
A bluetooth cooking thermometer can double as an oven temp monitor if the probe is long enough to hang in the air.
4. Infrared Thermometers (Gun Style)
Point, pull the trigger, read surface temperature. They are fast and great for checking cast iron pans or pizza stones.
But they measure surface temperature, not air temperature. If you aim at a dark pan, you get one number. Aim at the oven wall, you get another. They are not a replacement for an oven thermometer that sits in the air. Use these for spot checks on cookware, not for verifying the oven’s ambient heat.
5. Combination Oven and Grill Thermometers
These have a longer stem and a larger dial, meant to sit inside a grill or smoker. They also work in ovens if the stem fits between rack slats. They usually have a wider temperature range — up to 700°F or more.
The tradeoff is size. They can be bulky and may block heat circulation if placed badly. Use them only if you regularly push your oven above 500°F (for self-cleaning cycles or bread baking).
| Type | Typical Temp Range | Response Time | Best For | Caveat |
|---|---|---|---|---|
| Analog Dial | -100 to 600°F | 3–5 min to stabilize | Everyday baking, general accuracy | Hard to read from across the kitchen |
| Wired Digital Probe | 32 to 572°F (most) | 1–2 seconds | Continuous monitoring, precision | Wire can wear out, display near heat |
| Wireless Digital | 32 to 572°F | 1–2 seconds | Remote monitoring, overnight cooks | Batteries, higher cost |
| Infrared Gun | ‑20 to 800°F | Instant | Surface temps, pans, pizza stones | Not for air temp |
| Combination Grill/Oven | ‑100 to 700°F+ | 3–5 min | High-temp baking, grilling inside | Bulky, can block airflow |
How to Use an Oven Thermometer the Right Way
Buying the thermometer is step one. Placing it wrong makes it useless. Here is exactly what to do.
Place the thermometer on the center rack, toward the middle of the oven. If you use an analog clip-on model (like the Taylor), hook it over a rack bar so the dial faces the oven window. Do not set it directly on an oven rack without a clip — it might tip over when you slide a pan in.
Preheat the oven as usual. Wait until the oven says it is ready. Then wait another 10 to 15 minutes before checking the external thermometer. The oven needs time to cycle and stabilize. If you read it right when the beep sounds, you might catch a false peak.
Write down the difference between your oven’s set temp and the real temp. If your oven says 350°F but the thermometer reads 370°F, you know to set the dial 20 degrees lower next time. Tape that note somewhere on the oven or in a drawer so you do not forget.
Do not put the thermometer on the bottom rack or near the back wall. Those spots are hotter. On the bottom rack, the reading can be off by 40°F or more. Center rack, center of the oven — that is where your food lives.
What to Look for When Buying an External Oven Thermometer
Accuracy comes first. Analog models should claim accuracy within 10°F. Digital probes are often accurate within 2°F. The Taylor oven thermometer does not publish a specific variance on the box, but its NSF listing and long use in commercial kitchens suggest it holds tolerances well.
Temperature range matters. Most home cooking sits between 200°F and 500°F. But if you ever dehydrate at 150°F or use a self-cleaning cycle that hits 900°F, you need a thermometer that can handle that. The Taylor covers -100°F to 600°F, which is plenty for baking and roasting. For self-cleaning, you would need a special high-temp model, but you should not leave a standard thermometer in during a cleaning cycle anyway.
Build material. Stainless steel is best. It resists rust and warping. Glass thermometers exist but crack in ovens. Avoid any with plastic parts inside the oven cavity — they melt or discolor.
Readability. If you have to open the oven door to read the dial, you lose heat and mess up your cook. Look for models that have a large face or a clear display from 2 feet away. The Taylor’s white dial with black numbers is easy to read through a glass door. Digital displays with backlights are even better if you have dim kitchen lighting.
Frequently Asked Questions
Are oven thermometers accurate?
It depends on the brand and type. Good analog thermometers are usually within 10°F of true temperature. Digital probe models can be within 2°F. Cheap no-name dials can be off by 25°F or more. Always test a new thermometer by comparing it to a known accurate digital probe or using the ice water method (32°F) before relying on it.
Where should I place the thermometer in the oven?
Center rack, middle of the oven, about 1 inch away from any pan or wall. That gives the most representative reading for the air around your food. Do not put it on the bottom rack or near the heating element.
Can I leave an oven thermometer in the oven all the time?
Yes, if it is rated for continuous use at high heat. Analog dial thermometers like the Taylor can stay in. Digital transmitters usually are not meant for permanent placement in a self-cleaning cycle. Remove digital units during cleaning cycles or any temperature above 500°F.
How often should I check or calibrate my oven thermometer?
Once every three to six months. Drop the stem into a glass of ice water (stirred well) and the reading should be 32°F (0°C). For high side, use boiling water at sea level — 212°F (100°C). If it is off by more than 5°F, replace it. Dial thermometers can drift if dropped or exposed to very high heat.
Which is better: analog or digital oven thermometer?
For general baking, analog is simpler and more durable. No batteries, one moving part. For precision tasks like proofing bread at 80°F or tempering chocolate, digital probes give you faster, more exact readings. Many cooks keep one of each — a cheap analog for everyday use and a digital wireless for fussy recipes.
Five Things to Remember
- Your oven’s built-in thermostat lies. Trust an external thermometer on the center rack.
- Analog dial thermometers (like the Taylor) are durable, cheap, and good for everyday baking.
- For remote monitoring or precision, get a wireless or wired digital probe thermometer.
- Always wait 10–15 minutes after the preheat beep for the oven to stabilize before reading the thermometer.
- Test any new thermometer in ice water and boiling water to confirm its accuracy.
- Write down your oven’s real temperature vs. set temperature and keep it handy — it will save you from ruined batches.
- Remove all thermometers during self-cleaning cycles unless the manufacturer explicitly says it is safe.
