
How to Can Tomato Juice From a Juicer
You just spent the weekend picking tomatoes from your garden. A few are perfect for slicing. The rest? They're soft, cracked, or just too many to eat fresh. Dumping them in the compost feels wrong. Freezing works, but frozen juice takes up space and loses flavor over time. Canning is the answer. With a juicer and a water bath canner, you can turn a mountain of ripe tomatoes into shelf-stable juice that lasts a year or more. This article walks you through the exact steps, equipment, and safety rules so you do it right the first time.
After the intro, I'll cover prep, the canning process, common mistakes, and a FAQ. You'll know what to do with 20 pounds of tomatoes by the end.
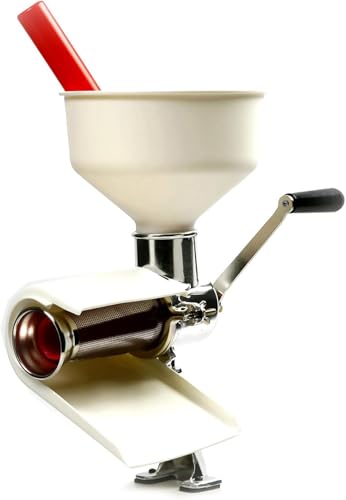
Sxmprail
Food Mill for Tomato Sauce, Tomato Juicer, Tomato Mill
- Food Mill for Tomato Sauce, Tomato Juicer, Tomato Mill
If your juicer produces juice with some pulp or seeds, a food mill can give you a smoother final product. The Sxmprail Food Mill for Tomato Sauce is a solid tool that handles large batches quickly. It separates seeds and skins without clogging, which is handy if you prefer a clear juice. I use one when I want a finer texture than my centrifugal juicer leaves behind.
1. Prep Your Tomatoes and Juicer
Start with the right tomatoes. Roma or paste tomatoes give thicker juice because they have more flesh and less water. Slicing or beefsteak tomatoes work too, but you'll get a thinner juice that may separate more. Either way, use only ripe, blemish-free fruit. Green or rotten spots can ruin the whole batch.
Wash the tomatoes under cool water. Cut out the stem ends and any bad spots. You do not need to peel them. The juicer handles skins, and the slight bitterness cooks off during processing.
Cut large tomatoes into quarters so they fit your juicer's feed chute. Small cherry tomatoes can go in whole. Feed them through the juicer at a steady pace. Don't overload — let the machine work. A centrifugal juicer like the Breville Juice Fountain Cold does a fast job with tomatoes. A masticating juicer takes longer but yields a higher juice volume. For a deep dive on which model suits you, check out this tomato juicer guide.
Yield wise: 20 pounds of tomatoes gives roughly 12 to 14 pints of juice. Weigh your harvest so you know how many jars to prep.
2. The Step-by-Step Canning Process
Canning tomato juice requires acidification for safety. Tomatoes are borderline low-acid. To prevent botulism, you must add bottled lemon juice or citric acid to every jar. Use 2 tablespoons of lemon juice per quart, or 1 tablespoon per pint. Citric acid: 1 teaspoon per quart, 1/2 teaspoon per pint. I prefer lemon juice — it doesn't alter the flavor much.
Equipment needed:
- Water bath canner with rack
- Canning jars (pints or quarts), new lids, bands
- Jar lifter, canning funnel, lid magnet
- Large pot or Dutch oven for heating juice
- Clean kitchen towels
Step 1: Sterilize your jars. Wash them in hot soapy water, then keep them hot in the canner or a 200°F oven. Lids go in a small pan of simmering water (not boiling).
Step 2: Heat the juice. Pour the juice from the juicer into a large pot. Bring it to a rolling boil over medium-high heat, stirring occasionally to prevent scorching. Boil for 5 minutes. This kills enzymes that cause separation.
Step 3: Add acid to each jar. Use a clean funnel. Put the measured lemon juice or citric acid directly into each hot jar. Add 1 teaspoon salt per quart if you like salted juice (optional).
Step 4: Fill jars. Ladle the hot juice into the jars, leaving 1/2 inch headspace. Run a nonmetallic spatula around the inside to release air bubbles. Wipe the rims clean with a damp towel. Center the lid, screw the band finger-tight.
Step 5: Process in water bath. Place jars on the rack in the canner. Cover with at least 1 inch of water. Bring to a full boil. Start timing when the water reaches a rolling boil.
| Jar size | Altitude 0–1,000 ft | Altitude 1,001–3,000 ft | Altitude 3,001–6,000 ft | Above 6,000 ft |
|---|---|---|---|---|
| Pints | 35 minutes | 40 minutes | 45 minutes | 50 minutes |
| Quarts | 45 minutes | 50 minutes | 55 minutes | 60 minutes |
Adjust times for your altitude. Processing ensures seal and safety. After the timer goes off, turn off heat and let jars sit for 5 minutes. Remove them with a jar lifter onto a towel. Let cool undisturbed for 12 hours. Check seals — lids should be concave and not pop when pressed.
3. Comparison: Juicer vs. Food Mill vs. Blender Strainer
You might wonder if a juicer is the best tool for this job. Here's how the three methods stack up for canning tomato juice.
| Factor | Juicer (centrifugal or masticating) | Food mill | Blender + strainer |
|---|---|---|---|
| Yield per 20 lb tomatoes | 12–14 pints | 10–12 pints (more pulp retained) | 9–11 pints (loss from straining) |
| Time to process 20 lb | 20–30 minutes juicing | 40–60 minutes grinding + straining | 30 min blending + 30 min straining |
| Texture control | Moderate (depends on juicer model) | High (change disc for coarse/fine) | High (strainer mesh size) |
| Equipment cost (ballpark) | $50–$300 | $30–$80 | $0 (already have blender) |
| Cleanup difficulty | Medium (pulp tray, strainer basket) | Easy (disassemble, rinse) | Hard (strainer mesh clogs) |
I prefer a juicer for speed. A food mill is better if you want to skip juicing and go straight from whole cooked tomatoes to smooth juice, but that adds a cooking step before milling. For pure raw juice with minimal work, a juicer wins.
4. Common Mistakes and How to Avoid Them
Even experienced canners mess up sometimes. Here are three pitfalls with fixes.
Boil-over during processing. Juice expands when heated. If you fill jars too full or don't release air bubbles, liquid seeps out. Solution: always leave 1/2 inch headspace and run that spatula through the jar.
Separation after canning. Juice naturally separates into clear liquid and sediment. That's normal. Hot-packing (boiling the juice before jarring) reduces separation. Stir the jar before drinking. If separation bothers you, add a pinch of sugar — it helps stabilize pectin in the tomato cells.
Spoilage signs. A bulging lid, mold, off-smell, or leakage means toss the jar. Don't taste it. Botulism toxin has no warning smell. Stick to proper processing times and acidification, and you'll never see it.
Frequently Asked Questions
Do I need to peel tomatoes before juicing for canning?
No. The juicer separates skins from the juice. If you use a food mill after juicing, it will catch any bits that slip through. Peeling adds hours of work with no benefit. Wash them well and cut out the stem scars.
How long does canned tomato juice last?
Stored in a cool, dark place (50–70°F), properly sealed jars keep quality for 12 to 18 months. The flavor slowly dulls after that. I rotate my stock and use the oldest first. Don't store above the stove or in direct sunlight.
Can I can tomato juice without a pressure canner?
Yes. Tomato juice is high enough acid if you add lemon juice. Use a water bath canner. Pressure canning is required for low-acid foods like green beans or carrots. For tomatoes, the water bath is safe and simpler.
Why did my canned tomato juice separate?
Separation happens when pectin and solids settle out. It's cosmetic, not a sign of spoilage. To minimize it, boil the juice before jarring (hot pack). Some people add a pinch of calcium chloride (Pickle Crisp) to keep it thicker. I just stir the jar before pouring.
Can I add salt or other vegetables?
You can add salt — 1 teaspoon per quart — for taste. But adding low-acid vegetables like celery, carrots, or onions changes the pH. If you blend them in, you must pressure can at 10 psi for 35 minutes for pints. For a plain tomato juice, stick with just salt, lemon juice, and maybe a basil leaf.
What to Do With Your First Batch
- Use ripe, unblemished tomatoes — avoid green or moldy ones.
- Juice without peeling; it saves time and doesn't affect safety.
- Add exactly 2 tablespoons lemon juice per quart for safe acid levels.
- Hot pack the juice (boil 5 minutes) before filling jars to reduce separation.
- Process pints for 35 minutes at altitudes under 1,000 feet; adjust for yours.
- Let jars cool 12 hours, then check seals. Label with date.
- Store in a dark, cool cupboard — not above the fridge or near a stove.
That's it. You've turned a pile of summer tomatoes into a pantry staple that saves you money and tastes better than anything from a store. Open a jar in January for soups, Bloody Marys, or just sipping. You'll be glad you did the work now.