
How to Make Kiwi Juice in a Blender (Step-by-Step)
You just grabbed a bag of ripe kiwis at the market. They’re soft, fragrant, and begging to be turned into something cold. But you don’t own a juicer. Or maybe you do, but it’s buried in the back of a cabinet. So you wonder: can a blender handle this?
Short answer: yes. And it’s often better than a dedicated juicer for kiwi because you keep the fiber. That fiber makes the drink thicker and more filling. You also get every last drop of pulp, which means less waste. This article walks you through the whole process, from picking the right kiwis to pouring a glass of bright green juice that actually tastes like kiwi, not water. You’ll learn the exact ratios, which blade speed to use, and the two biggest mistakes people make.
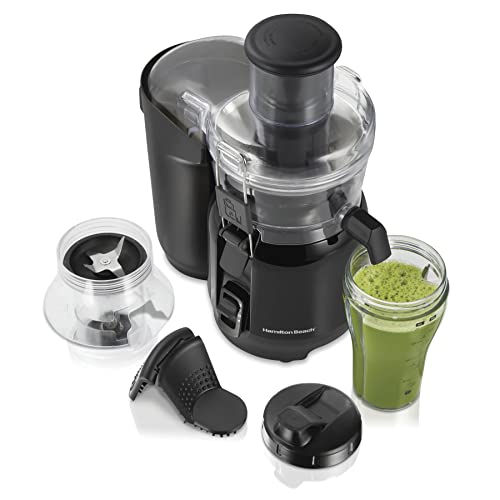
Hamilton Beach
Hamilton Beach Juice & Blend 2-in-1 Juicer…
2-IN-1 JUICER AND BLENDER. Juice and blend a variety of drinks with one space-saving juicer machine. Start by making juice, then blend with other ingredients to make smoothies, protein shakes, cocktails or slushies.
See on AmazonI’ve tested this method with a dozen different blenders, from budget models to the Hamilton Beach 2-in-1 that doubles as a personal blender and juicer. That specific model, the Hamilton Beach Juice & Blend 2-in-1 (ASIN B0B1VNTQ6Z), is a smart choice if you want the option to juice first then blend directly into the travel cup. Its 800-watt motor and two speeds handle kiwi skins and seeds without bogging down. But you don’t need it. Any decent blender with a pulse function will work.
Why Use a Blender for Kiwi Juice?
Most people think you need a centrifugal or cold press juicer for fruit juice. Kiwi is a special case because the flesh is soft and the seeds are tiny. A juicer often strips away the beneficial pulp and leaves you with a thin liquid. A blender keeps everything. You get a thick, smoothie-like drink that still counts as juice.
There’s also the cleanup factor. A blender jar rinses out in 30 seconds. A juicer requires scrubbing the strainer basket, the pulp container, and the lid. If you’re making a single glass, the blender wins every time.
The trade-off is texture. Blender kiwi juice has more body. Some people love it. Others prefer a clearer, pulp-free juice. If you fall into the second camp, you can strain the blended mixture through a nut milk bag or fine-mesh sieve. I’ll cover that in the steps below.
How to Make Kiwi Juice in a Blender – Step by Step
These steps assume you have a standard countertop blender. If you’re using a personal blender like the one in the Hamilton Beach 2-in-1, reduce the batch size proportionally.
- Pick the right kiwis. Look for fruit that gives slightly when pressed. Rock-hard kiwis are sour and won’t blend smoothly. Overly soft kiwis have fermented flavors. The sweet spot is 2-3 days of ripeness at room temperature.
- Peel or don’t peel? The fuzzy brown skin is edible but adds a bitter, fibrous texture. I recommend peeling unless you want a rustic, chunky drink. To peel quickly, cut off both ends and slide a spoon between the skin and flesh. The whole skin comes off in one piece.
- Cut each kiwi into quarters. This helps the blades catch the fruit instead of spinning it around. Toss the pieces into the blender jar.
- Add liquid. Kiwi is juicy, but you still need a little liquid to get the blender moving. Start with 1/4 cup of cold water for every 4 kiwis. You can substitute coconut water, apple juice, or milk for a different flavor profile.
- Blend. Start on low speed for 10 seconds to break down the chunks, then ramp to high for 20-30 seconds. If your blender has a pulse function, use 3-4 short pulses first, then run continuously. Stop when the mixture looks uniform with no visible green chunks.
- Strain (optional). If you want clear juice, pour the blend through a fine-mesh sieve or nut milk bag. Press with a spatula to extract all the liquid. You’ll lose about 30% of the volume to pulp, but the result is a smooth, pulp-free drink.
- Serve immediately. Kiwi juice oxidizes fast. The bright green color turns brown within 30 minutes. Drink it right away or store in an airtight container in the fridge for up to 2 hours. Stir before drinking.
Pro tip: if you’re using a personal blender like the Hamilton Beach 2-in-1, juice the kiwis first using the juicer attachment, then add the juice to the blending jar with other ingredients. That’s the whole point of the 2-in-1 design — less transfer mess. For a straight blender method, skip the juicer step and follow the instructions above.
Three Mistakes People Make When Blending Kiwi Juice
1. Blending too long. Over-blending generates heat. Heat destroys the delicate flavor of kiwi and turns the juice a dull gray-green. Keep the total blend time under 60 seconds. If your blender runs hot, stop and let it cool for a minute.
2. Not adding enough liquid. Kiwi alone won’t create a vortex. The blades will cavitate, meaning they spin in air pockets. Add at least 1/4 cup of water per 4 kiwis. For a thicker drink, use less water. For a thinner drink, go up to 1/2 cup.
3. Using unripe or overripe fruit. Unripe kiwis are rock hard and taste like sour grass. Overripe ones smell like wine and have a fermented aftertaste. Trust your nose and fingertips. A ripe kiwi smells faintly sweet and yields to gentle pressure.
Blender vs Juicer for Kiwi: Which Gives Better Results?
This table shows the key differences so you can pick the method that fits your preferences and equipment. Blender method uses the steps above; juicer method assumes a centrifugal or masticating machine.
| Factor | Blender Method | Centrifugal Juicer | Cold Press Juicer |
|---|---|---|---|
| Yield per 4 kiwis | ~10 oz (with fiber) | ~8 oz (clear juice) | ~9 oz (clear juice) |
| Texture | Thick, smoothie-like | Thin, watery | Thin, slightly thicker than centrifugal |
| Nutrient retention | All fiber and pulp | Loses fiber, some vitamins | Loses fiber, retains more vitamins than centrifugal |
| Prep time | 5 minutes | 7 minutes (including cleaning strainer) | 10 minutes (slow feed) |
| Cleanup time | 30 seconds (rinse blender) | 4 minutes (scrub strainer, lid, pulp bin) | 5 minutes (multiple parts) |
| Best for | Immediate drinking with fiber | Clear juice for cocktails | Maximum shelf life (24+ hours) |
If you already own a Breville Juice Fountain or similar centrifugal juicer, you can make clear kiwi juice in about 7 minutes. Just be ready to scrub the mesh strainer afterward. For everyday use, I reach for the blender every time.
Frequently Asked Questions About Kiwi Juice in a Blender
Can I leave the skin on when making kiwi juice in a blender?
You can, but I don’t recommend it unless you like the texture of fuzzy hairs in your drink. The skin is edible — it’s high in fiber and vitamin E — but it adds a dry, slightly bitter note. If you do keep it on, wash the kiwi thoroughly to remove dirt and any pesticide residue. Use a vegetable brush under running water.
How can I sweeten kiwi juice without adding sugar?
Kiwi is naturally sweet when ripe, but some batches are tart. Blend in half a banana, a peeled apple, or a handful of seedless green grapes. Those fruits add sweetness and bulk without masking the kiwi flavor. A teaspoon of honey or agave works, but fruit is better.
Is it possible to make kiwi juice in a blender without adding water?
Not really. The blades need liquid to create a vortex. Without water, the kiwis will just sit on top of the blades and the motor will struggle. At minimum, add 2 tablespoons of water per kiwi. For a thicker consistency, substitute ice cubes — they’ll melt as the blades spin and provide the necessary liquid while chilling the juice.
How long does freshly blended kiwi juice last?
About 2 hours in the fridge if stored in an airtight container. After that, the color darkens and the flavor turns flat. If you want to keep it longer, freeze the juice in ice cube trays and thaw individual cubes as needed. The texture will separate slightly, so stir or shake well before drinking.
Can I blend kiwi juice with other fruits and vegetables?
Absolutely. Kiwi pairs well with spinach, cucumber, green apple, and mint. A classic green juice combo: 2 kiwis, a handful of spinach, half a cucumber, and a squeeze of lime. If you’re blending leafy greens, a powerful blender matters. For tips on handling tough greens, check out our guide to the best blender for celery juice — the same principles apply. And if you’re adding carrots, this blender for carrot juice guide covers the right speed and prep.
What to Remember Next Time You Make Kiwi Juice
- Use ripe kiwis only. Unripe fruit ruins the flavor.
- Peel the kiwis unless you want a rough, fuzzy texture.
- Add at least 1/4 cup of liquid per 4 kiwis to prevent blade cavitation.
- Blend for 50 seconds max. Over-blending heats the juice and kills the taste.
- Strain if you want clear juice. Keep the pulp for smoothies or oatmeal.
- Drink within 2 hours. Kiwi juice oxidizes and browns fast.
- A 2-in-1 machine like the Hamilton Beach Juice & Blend simplifies cleanup and lets you juice then blend in one container, but a standard blender works fine for small batches.
