How To Disassemble Black And Decker Juicer?
[su_note note_color=”#fb8e00″ text_color=”#000000″ radius=”12″]
If you’re on the hunt for a guide on how to disassemble your Black and Decker juicer, you’ve come to the right place. Whether you’re looking to give your juicer a thorough cleaning or need to make some repairs, Assimilating the steps and process of disassembly is essential.
With our simple instructions, you’ll be able to effortlessly take apart your juicer and tackle any maintenance tasks with ease. Say goodbye to frustration and hello to a smoothly functioning juicer. So, grab your tools and let’s dive into the world of dismantling your Black and Decker juicer.
[su_box title=”
[/su_box]
Safety Precautions
1. Disconnect the Juicer
To ensure your safety, the first step in disassembling your Black and Decker juicer is to disconnect it from the power source. This will prevent any potential electrical hazards Whilst handling the juicer parts.
2. Allow the Juicer to Cool Down
Prior to disassembly, it is important to allow your juicer to cool down. Operating the juicer continuously or disassembling it immediately after use can result in hot parts that may cause burns. For your safety, give the juicer enough time to cool down before proceeding.
3. Use Protective Gloves
When disassembling your Black and Decker juicer, it is recommended to wear protective gloves. This will not only protect your hands from any sharp edges but also provide a barrier between your skin and any cleaning agents or residues that may be present on the juicer parts.
If you have any questions regarding specific safety measures for your Black and Decker juicer model, always refer to the manufacturer’s manual or contact their customer support for guidance.
[su_highlight background=”#f6b40f”]Expert Tips for Safe Juicer Disassembly:
1. Disconnect from power source.
2. Allow juicer to cool down.
3. Wear protective gloves.
Refer to manual or contact customer support for more safety measures.[/su_highlight]
Prepare the Workspace
Before taking apart your Black and Decker juicer, it is essential to properly set up your workspace. Follow these steps to ensure an organized and efficient disassembly process:
1. Select a Clean and Well-lit Location
Find a suitable spot in your kitchen or workspace that is clean and well-lit. This will allow you to see the juicer components clearly and minimize the risk of accidents or misplacements. Ensure there are no distractions or clutter in the area.
2. Use a Towel or Tray to Catch any Spills
Disassembling a juicer may result in juices or water dripping. To prevent any mess, place a towel or tray underneath the juicer. This will catch any drips and make the cleaning process easier. It will also protect your countertop or other surfaces from damage.
| Workspace Preparation Checklist: |
|---|
| 1. Select a clean and well-lit location |
| 2. Use a towel or tray to catch any spills |
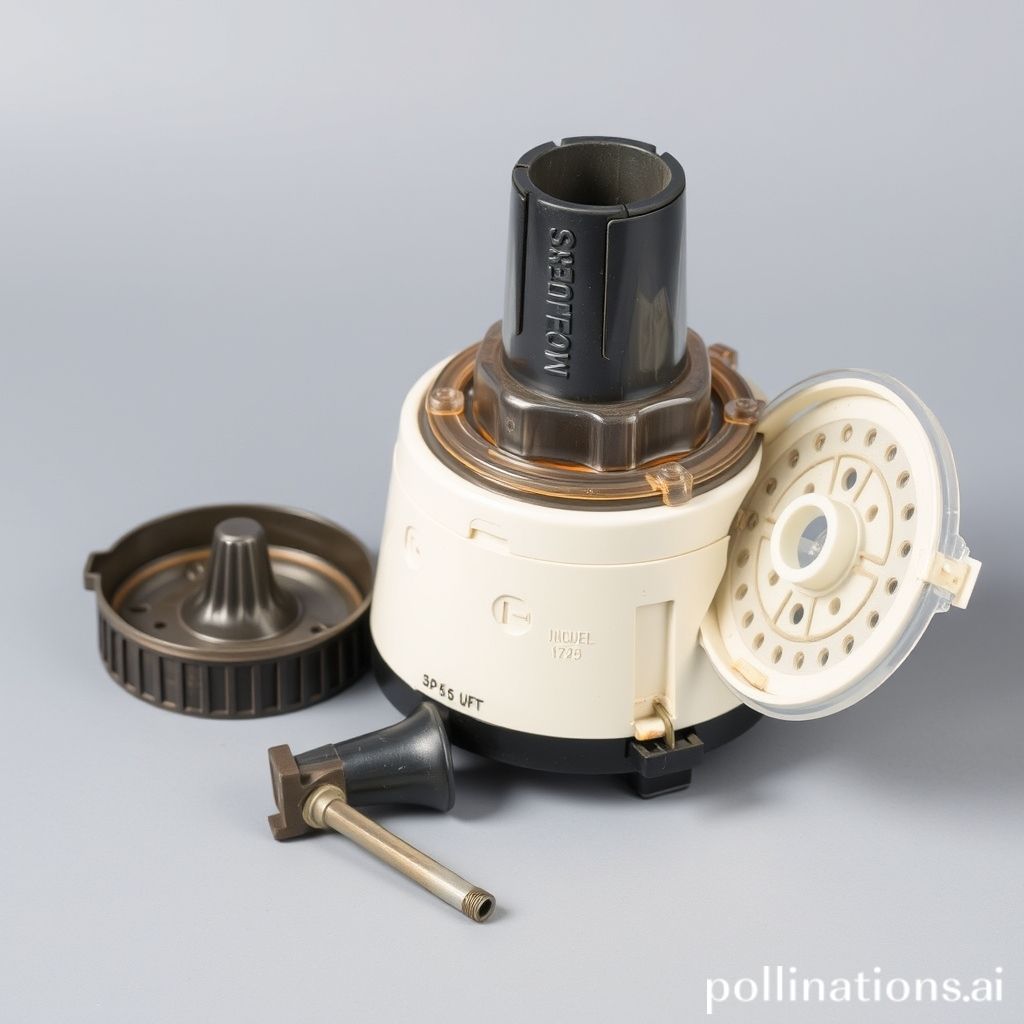
How to Take Apart a Black and Decker Juicer
Removing the Juicer’s Parts
If you need to clean or repair your Black and Decker juicer, follow these steps to disassemble it:
1. Removing the Lid and Pusher
Start by taking off the juicer’s lid. This part covers the feeding chute and can be detached. Lift it off and set it aside. Next, find the pusher, which is a small tool used to guide fruits or vegetables into the juicer. Remove the pusher and keep it aside as well.
2. Taking out the Pulp Container
Locate the pulp container, which collects leftover pulp during the juicing process. It is usually situated at the back or side of the juicer. Gently pull it out and empty the accumulated pulp. Clean the pulp container separately if necessary.
3. Unscrewing the Juice Collector
Find the juice collector, which is the container that collects the extracted juice. It is typically positioned below the juicing mechanism. Hold the juice collector securely and unscrew it counterclockwise. Once unscrewed, lift it off and set it aside.
4. Detaching the Strainer and Cutter Assembly
In the center of the juicer, you will find the strainer and cutter assembly. This component separates the juice from the pulp. To detach it, locate the locking mechanism or release button. Press or twist it to unlock the strainer and cutter assembly. Once unlocked, carefully lift it out of the juicer.

How to Clean the Disassembled Parts of a Black and Decker Juicer
Step 1: Rinse the Parts with Warm Water
After you have disassembled your Black and Decker juicer, the first thing you need to do is rinse the parts with warm water. This will help remove any loose debris or residue.
Step 2: Use a Brush to Remove Residue
If there is stubborn residue or pulp stuck on the parts, use a brush with soft bristles to gently scrub and remove it. Make sure to choose a brush that is not too abrasive to avoid damaging the parts.
Step 3: Soak Parts in Warm, Soapy Water
Next, fill a basin or sink with warm water and add a small amount of mild dish soap. Place the disassembled parts of the juicer into the soapy water and let them soak for a few minutes. This will help loosen any remaining residue.
Step 4: Rinse and Dry Thoroughly
After soaking, remove the parts from the soapy water and rinse them thoroughly with warm water to remove any soap residue. Once rinsed, use a clean towel or cloth to dry the parts completely before reassembling your juicer.
| Important Tips |
|---|
| Remember to unplug the juicer before cleaning and never put the motor or electrical components in water. |
| Refer to the manufacturer’s instructions for any specific cleaning recommendations or restrictions. |
| Regularly cleaning your juicer will help maintain its performance and prolong its lifespan. |
Cleaning the disassembled parts of your Black and Decker juicer is crucial for keeping it in optimal condition. By observing these simple steps, you can ensure that your juicer remains clean and ready to use whenever you need it.
[su_note note_color=”#ea2e0c” text_color=”#ffffff” radius=”8″]Extra Tips: Ensure your juicer’s longevity by regularly cleaning the disassembled parts, avoiding water contact with the motor, and consulting the manufacturer’s instructions.[/su_note]
Reassemble the Juicer
Step 1: Attach the Strainer and Cutter Assembly
To start reassembling your Black and Decker juicer, first attach the strainer and cutter assembly. This part separates the juice from the pulp as you use the juicer. Align the tabs on the assembly with the slots in the juicer’s main body. Twist the assembly clockwise until it locks into place. Make sure it is securely attached before moving on.
Step 2: Screw on the Juice Collector
Next, screw on the juice collector. This is where the freshly extracted juice will collect. It is usually located below the strainer and cutter assembly. Align the threads on the collector with the corresponding threads on the juicer’s main body. Turn the collector clockwise until it is tightly secured. Ensure it is firmly attached to prevent any leaks.
Step 3: Place the Pulp Container
After attaching the juice collector, place the pulp container. This is where the discarded pulp will accumulate. It is typically located on the side or back of the juicer. Slide or snap the container into its designated position. Ensure it is securely in place before proceeding.
Step 4: Insert the Lid and Pusher
The final step is to insert the lid and pusher. The lid covers the top of the juicer and prevents splattering during juicing. Align the tabs on the lid with the corresponding slots on the juicer’s main body. Press it down until it clicks into place. The pusher is used to guide fruits or vegetables into the juicer’s feeding chute. Insert the pusher into its designated slot, usually located on the top of the lid. Ensure both the lid and pusher are securely attached for safe and efficient juicing.
By upholding these simple steps, you can easily reassemble your Black and Decker juicer after cleaning or repair. Refer to the user manual for specific instructions related to your juicer model. Regular cleaning and maintenance will prolong the lifespan of your juicer and ensure optimal performance for delicious and healthy homemade juices.
Conclusion
Disassembling a Black and Decker juicer is a straightforward process that can be easily accomplished By observing a few simple steps. By carefully removing the various components of the juicer, users can effectively clean and maintain their appliance to ensure optimal performance and longevity.
Regular disassembly and cleaning not only improve the juicer’s functionality but also promote hygiene and prevent the build-up of residue or debris. By taking the time to disassemble and clean their Black and Decker juicer, users can enjoy delicious and nutritious juices for years to come.
Frequently Asked Questions about Disassembling Black and Decker Juicer
FAQ 1: How often should I clean my Black and Decker juicer?
It is recommended to clean your Black and Decker juicer after each use. Regular cleaning helps maintain the performance and lifespan of the juicer and prevents the buildup of residue or pulp.
FAQ 2: Can I put the juicer parts in the dishwasher?
Yes, most Black and Decker juicer parts are dishwasher safe. Despite this, it is essential to refer to the product manual for specific instructions. Some delicate parts may require handwashing to avoid damage.
FAQ 3: How do I know if my juicer needs repair?
If you notice a decline in the juicer’s performance, such as reduced juice extraction or unusual noises, it may indicate that your juicer needs repair. Additionally, if you see visible damage to any parts or experience difficulties At the same time using the juicer, it is advisable to contact the manufacturer or a qualified repair professional.
FAQ 4: Can I use abrasive cleaners on the juicer parts?
No, it is not recommended to use abrasive cleaners on Black and Decker juicer parts. Abrasive cleaners can scratch or damage the surfaces of the juicer, affecting its functionality and appearance. Instead, use mild dish soap and a soft brush or sponge for effective cleaning.
FAQ 5: What should I do if I can’t disassemble my juicer?
If you are having trouble disassembling your Black and Decker juicer, make sure to consult the product manual for detailed instructions. It is important to follow the correct disassembly procedure to avoid any damage. If you still can’t disassemble it, reach out to the manufacturer’s customer support for further assistance.
Read Similar Post:
1. The Ultimate Guide to Choosing the Perfect Juicer: Expert Recommendations and Tips
2. Effortless Clean-Up: Find the Easiest Masticating Juicer for Quick and Hassle-Free Cleaning